It’s inevitable that pianos will get bumped, scratched and scuffed. High polish finishes are like mirrors and when something unfortunate happens, it can be not only disappointing but daunting to know how to remedy the situation. In this 2-part series we are first going to investigate removing scuffs and hairline scratches and then in the second part, we’ll look into chip and deeper scratch repairs.
Disclaimer: while this presents one solution to repairs, this is by no means exhaustive. It is just one method that I have found to be successful over years of working with pianos. If you don’t have the right equipment or feel unsure about tackling a finish, you might be better off not doing the work and talking to a professional. We are not responsible for your piano and the subsequent results. This is simply a demonstration that shows how to get successful results.
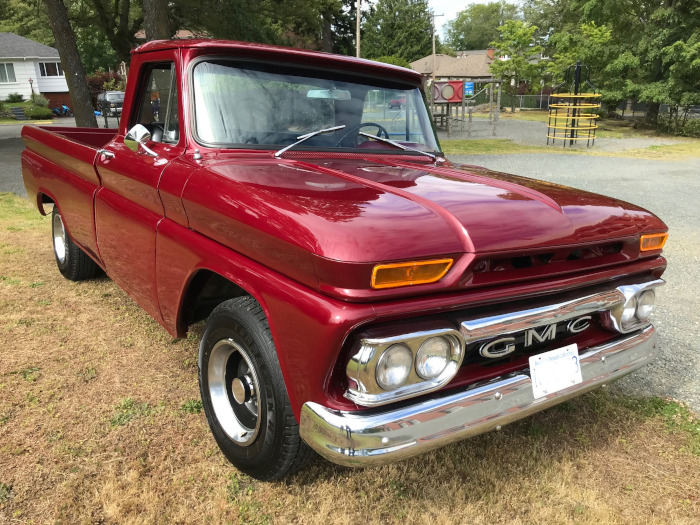
Everything I have learned has come from either the automotive world or guitar gurus which has led me to write this article. The truck pictured above was a fun project I did a few years ago. And while there’s ample amounts of information on the internet shown for vehicles, there simply isn’t enough written on piano finishing and more specifically, touch-up and repairs. I’ve always been fascinated by piano finishes because they are considered one of the highest achievements in furniture. To make a mirror gloss finish is a thing of beauty but requires incredible skill to accomplish. At their core, however, they’re identical to a great looking finish on a car – they both have sprayed urethane finishes that are polished to a mirror sheen.
There’s clean and then there’s CLEAN
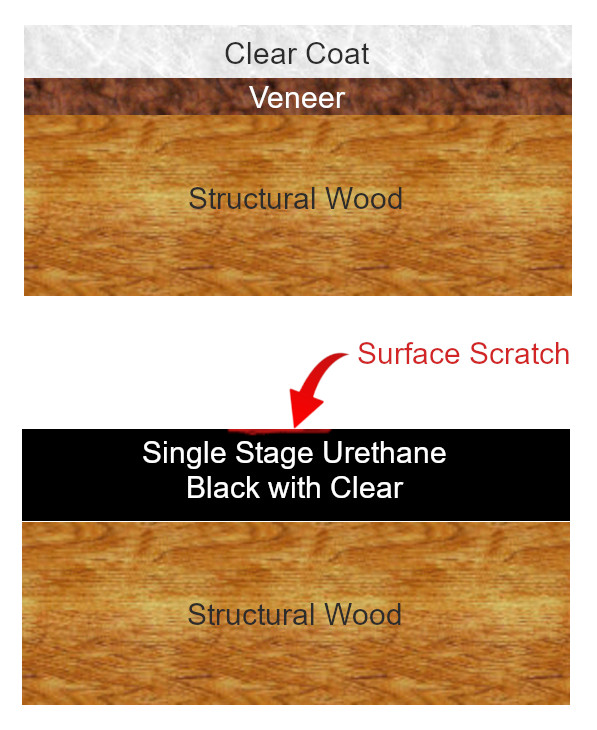
Several decades ago I decided to take a course on furniture finishing. I knew nothing about finishing – zero – zip – zilch. I had no idea how far away I was from black shiny pianos but my sights at the time were on restoring vintage pianos. I remember working on my first piano. It took me better part of six months (part time) to complete. I remember sitting in this French polishing class and the teacher’s first lesson was on the “anatomy of furniture”. I simply had no idea that most fine furniture was veneered, having a structural base layer of wood topped by a thin layer of wood called a veneer. (pictured on the left). Beautiful cuts of wood are not structural. What gives wood “figure” or patterns in the grain comes from roots or branches. When sliced, it reveals these incredible shapes. To enhance these dazzling cuts of wood even further, a clear coat is layered on top of the veneer to provide gloss and depth. When you see a wood-grained piano like walnut or mahogany, that’s the cutaway of the piano. What’s called High Polish Ebony pianos (pictured right) are similar in that they have a structural core, and a synthetic non-porous veneer but then they’re coated usually with single stage urethane. Once coated and cured, it hardens so much that it can be then polished to a mirror sheen.
 Scratch vs. Scuff
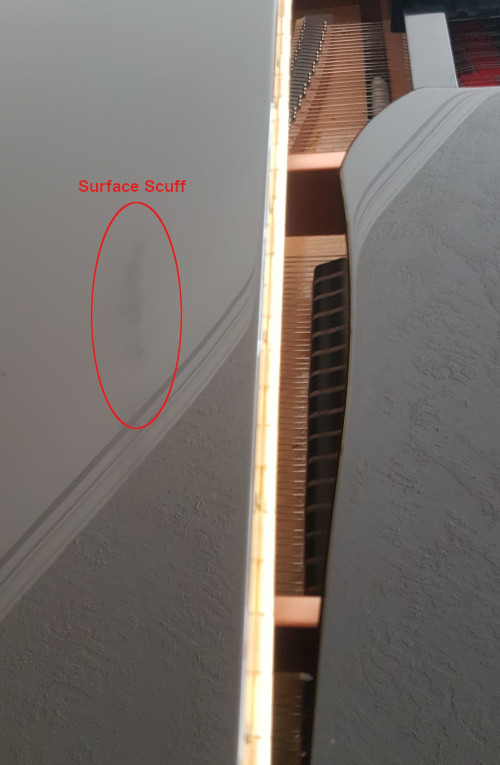
In order to do repairs, you first need to evaluate the abrasion. A scuff is a rub mark on the very outer surface of the paint. Very light rub marks can be buffed out with a buffing wheel. If you were to look under a microscope, a scuff – what looks like a cloudy patch – is actually tiny little scratches that make the finish look like a foggy area. Buffing wheels only take out the tiniest of scratches. In essence, scratches are on a continuum. A scuff, really is a collection of microscopic scratch lines. Sometimes found on pianos are also hairline scratches. These are often found on a music rack where coil bound books rest. Sometimes people plunk down keys or a violin case on the piano. This creates hairline superficial scratches that can’t be felt but can be seen. They make the finish look hazy or dull. Finally, there are scratches that can be felt with the fingernail. One of the most important things you can learn in finishing is the saying “if you can feel it, you’ll see it”. Oddly enough, the repairs that we want fixed for visual purposes are often discovered by touch. These kinds of scratches must first be filled, but today’s objective is to bring scuffs and superficial scratches back to a shine.
There’s clean and then there’s CLEAN
Before you do anything in piano finishing. The surface must be absolutely clean. Why? Any grit left on the surface when rubbed will have counter-productive results and actually make scratches. When you think of it, sandpaper is simply paper with a bunch of grit glued to it. If you have dust and grime on the surface and you wipe it, it’s actually like a very fine piece of sandpaper. You’re creating scratches. To clean the surface, I like to use Cory polish products with a soft chamois. Then go back and wipe the area with your bare hand. You’ll discover that there’s sometimes residual dirt that you can’t see but you can feel.
Fixing the scuff
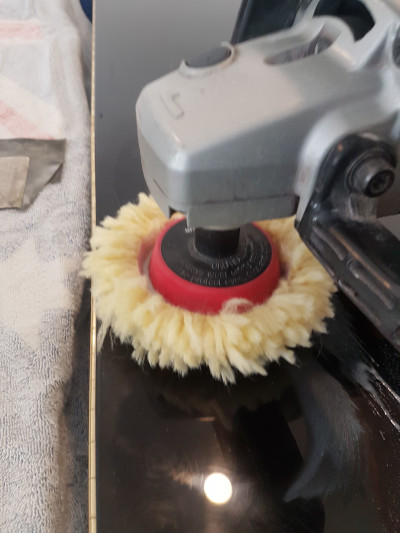
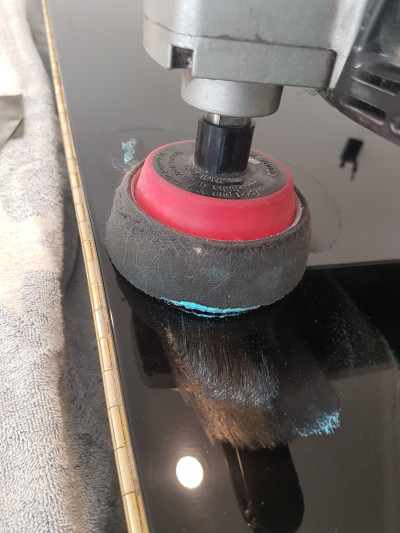
There are 2 parts to finish correction. The first is sanding and the second is buffing. While you can sand with a machine, often it’s far too large and far too uncontrollable in speed and accuracy. In other words, you can create more damage too quickly by sanding with a sanding machine. With very light scuffs in a small area, you need a light touch and work the area by hand. Buffing, however is all about the machine to achieve the desired sheen. For this you need high speed combined with a soft wheel.
Testing the waters
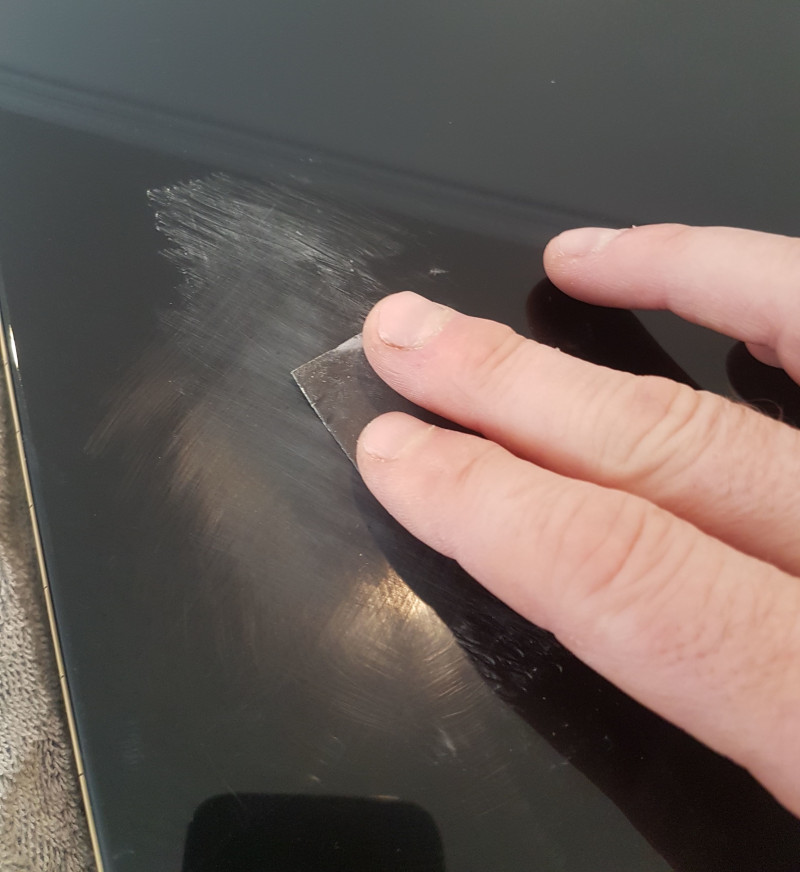
As previously mentioned, test the scratch with your fingernail to find out if it’s deep. If you can’t feel it, it’s a either hairline scratches or a scuff. With light scratches, I first try the buffing wheel to see if there’s any success with buffing. Sometimes that’s all it takes. But most times, a bit more work is required. With this light scuff, I was hoping that a small bit of buffing would be all I need but after 30 seconds on the buffing wheel, there was still no significant change. It’s time to move to sanding.
Sanding grits
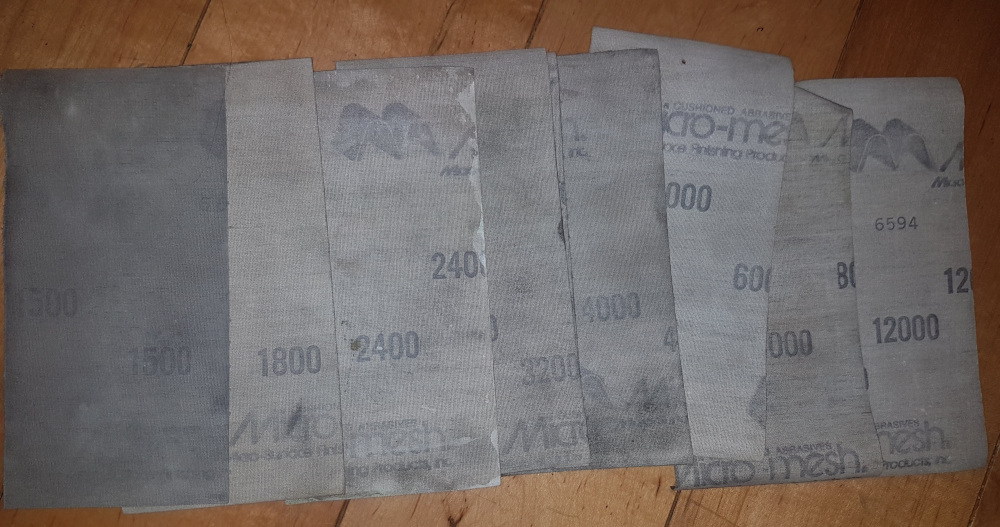
Most people think in terms of sandpaper for woodworking. All sandpaper has grit numbers that are associated with various tasks. The numbers start at 60 grit (REALLY course) and go up to finer grit of 400 (quite smooth). These are what you’ll find at most hardware stores. For paint correction, these grits are WAY too abrasive. The low number sandpaper we need start at around 600 and range all the way up to 2000… or so I thought. Many years ago I was introduced to Micro-Mesh sanding. It’s a series of re-usable “sandpaper” (actually cloths) that starts at 1500 and range to 12000 grit. Their numbers don’t correspond to regular sandpaper but the equivalent would be about 700-3500 grit. I’ve had my kit for at least 15 years and it keeps working. When sanding out the top layer where scuffs are, these sanding cloths are ideal.
 Sanding
The objective with sanding is to use the highest number sandpaper to remove the scratch. For fine scratches, the starting range will be between 600 and 1200 grit to get started. There’s a little trial and error to see what you need to use to make the scuff marks disappear. The depth of these scuffs was more substantial than I first thought. I used a tiny square of 600 and did a cross-hatch pattern. The pressure here is incredibly light. If you add substantial pressure on the sandpaper it will only make a visible indent in the finish. After only a few seconds, wiping with my hand, I can see that I’ve made a scratch pattern. What I’m looking for is evidence that the original scuff has been replaced with my own scratches. I then move on to Micro-Mesh. The idea with sanding out scratches or scuffs is that each consecutive grade of sandpaper eliminates the previous scratches. As you move to finer and finer paper, you’re actually causing more reflection and eventually it will become smooth. With Micro-Mesh, you start with their 1500 grit (which equates into about 700 grit of regular paper). I move in 2 directions only -side to side and up and down so that I can see if the previous lines have been removed. On the next grit, I more on a 45 degree angle from the last paper, side to side, up and down. What I’m looking for is the removal of the previous sanding marks. By the time I’m done sanding with 1500, the previous pattern then is replaced with the 1500 cross-hatch pattern. After 1500, is 1800. Again I use a different 45 degree sanding pattern to know that I’ve correctly sanded out the previous layer. This continues on – 2400,3200,4000 and 6000. I stop before using the 12000 and move to the buffing wheel. How long do I use each paper? 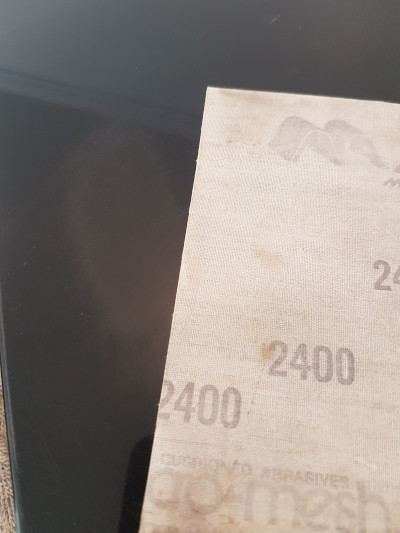 The answer is simply, until you’ve visibly changed sanding pattern directions but it’s usually not more than a minute or two. While I could have finished the job by hand, there’s something to be said about efficiency. As I move higher in the grit, around 3200 I move back into a circular random pattern. And while my sanding by hand orbits maybe twice per second, about 120 rotations per minute, the buffing wheel speed I like ranges from 1200-1800. You see my point… the wheel is faster. Note also that I’m sanding a much larger area than the scuff itself. The idea is to blend into the rest of the finish and taper the sanding to the rest of the piece. I also forgot to show the sponge that comes with Micro-mesh. It works extremely well with their cloths.
Dangers when polishing
Polishers are fabulous to work with and really are the icing to the cake in piano finishes. Having witnessed professional workers who use polishers at the factory who do this every day, it’s a thing of beauty to see finishes get transformed into mirror gloss. But spinning at 1500 RPM means you need to be in control. Slower is always better. It just takes longer. An out-of-control buffing wheel can jump or move sideways and in a second can create more damage than good. The second danger is heat. You never want to burn a finish. I’m always starting and stopping, ensuring that heat due to friction isn’t a problem and that the surface is sufficiently lubricated either with compound or water. Ask me how I know about such dangers… in the words of Mark Twain “Good judgement is the result of experience and experience the result of bad judgement.” An EXCELLENT series on buffing can be found with from Kevin Tetz on automotive paint correction. The 3 part series is long but if you’re serious about scuff and scratch removal, this taught me a lot in the early days of learning these skills.
 Compounds
What is a compound? It’s like sandpaper in a cream. It’s used in conjunction with buffing wheels. The buffing wheels spin and the compound does the polishing. Where sandpaper leaves off, the combination of the wheel with compound brings the finish back to a shine. 2 companies that I’ve had great results with are 3M and Norton. 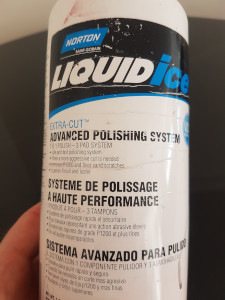 There are undoubtedly others but these are used in the automotive world and are excellent. A great compound will, with friction break down and become then a finer grit. So it starts off course and with the wheel spinning, it becomes finer. In addition to compound, I always have a spritzer of water. At times, the compound clogs and a small squirt of water will continue lubricating the compound. Oh and don’t worry about a few drops of water on the finish. Think of it more like glass at this stage. I know that some might find getting water on a piano alarming but the wood is covered by a deep level of finish. The water is nowhere near the wood on the piano.
Types of wheels
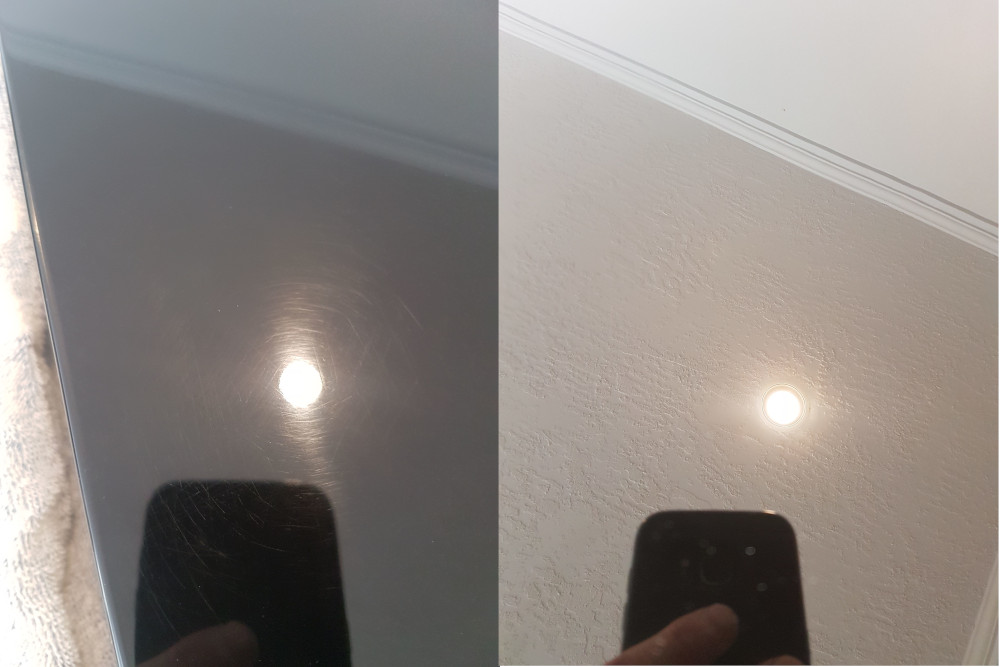
I only use 2 wheels – a lamb’s wool bonnet and an ultra-fine foam. The difference? I spend most of my time on the wool pad. A wool bonnet has various strands of wool. It does the main work of removing any visible scratch pattern. When I’m done with that, you’ll be left with an almost finished product. Against the light, however, you’ll see a halo when you look at a direct light reflection. Check out the comparison photo below. On the left is a finish having just completed the wool pad and on the right, the difference with foam pad. The remaining halo visible against the light is the job of the foam pad and fine compound. A few minutes on this wheel and it’s done.
I go back to my Cory polish and a soft cloth to remove any residual compound. It can be quite satisfying to successfully remove scuffs out of a piano. It can also seem quite daunting.
Final thoughts
Sometimes if you’re lucky, the scuff of scratch on your piano is on a component that can be detached from the piano. I remember once, long before I knew how to do any of this, I had a piano with a scratched music desk. I took it to an automotive shop. A few dollars and a box of donuts and I came out with a new looking music rack! Urethanes for automotive paint is similar to piano finishes and so the buffing procedure is the same. Both cars and pianos are brought to a complete shine. Only in the automotive paint world, they’re dealing with accidents daily. There’s a wealth of knowledge that automotive specialists are experienced with. They really know how to deal with paint correction. And better still, there’s usually several autobody shops found in every city. Finishing is really a whole different world to the mechanics of pianos and solutions are often better found through finishing trades that are dealing with gloss finishes.
I hope you enjoyed this brief example. Stay tuned to look at how to fix black chips on a piano!
Materials Used
Cory Polish
Chamois cloth
600 grit paper
Micro Mesh
Norton rubbing compound – course and fine
Makita polisher
Wool pad
Foam pad
More Piano Articles

You’ve been playing your piano for years now and the time has come to seriously consider downsizing the house and move into a condo. But what do you do with the piano? You love your piano and can’t imagine life without it and besides, you absolutely hate the idea of playing a digital keyboard. Many people don’t know that you can add digital functionality without compromising your existing piano. Yes, it is completely possible to ...
Many years ago, I remember seeing a piano in a museum similar to the one shown above (built in 1787 by Christian Gottlob Hubert. On display at Germanisches Nationalmuseum - Nuremberg, Germany). I have often wondered why acoustic portable pianos never really took off. Although we've seen more portable keyboard instruments like harpsichords, accordions or electronic keyboards, they operate completely different from a traditional piano in that they either pluck the strings, use air with ...

This was the first year since covid that the National Association of Music Merchants (NAMM) trade show was back to its regular January date and, in fact the first show where it felt back to normal. How was it? To answer that, I'm going quickly review the piano market over the last few years. Piano sales boomed during covid. Think about it - everyone was at home and with time on their hands, many turned ...
I’ve often wondered when the business model of piano buying would start to change. It seems like we feel comfortable purchasing everything from toothpaste to tires online and yet pianos are one thing that you still buy in a store. Well some of that is about to change. After speaking with Larry Caruso from Caruso Piano, they’re launching a brand of piano made specifically for online ordering. It’s called
Sonnova. I recently had the pleasure ...

The thought of buying a piano can be exciting but it can also be a bit intimidating or daunting, especially if you don’t know anything about them. But have no fear, because at Piano Price Point, we’ve compiled so much of the data and written articles to make your job easier. To narrow down the scope of buying a piano, you first need to decide what kind of piano you’re looking for. Ask yourself these ...

Money, apparently
does grow on trees or at least in ancient times it did. It's been recorded that rare tree sap was used as a form of payment for tax because it was deemed so valuable. This sap from the tree was harvested and refined into lacquer with incredible clarity and sheen. Many thousands of years ago, it was reserved for imperial palaces, religious temples and shrines. Early
examples have been dated to 7000BC. It ...